In the ever-evolving digital landscape, mastering the intricacies of popular platforms like iTunes is crucial for seamless user experiences. Whether you’re a music enthusiast, podcast addict, or just someone looking to streamline your media library, understanding how to authorize a computer on iTunes is paramount. In this comprehensive guide, we’ll navigate the steps together, ensuring you not only gain access but also optimize your iTunes account for a smoother journey into the world of digital entertainment.
Understanding iTunes Authorization
Before delving into the nitty-gritty details, let’s grasp the concept of iTunes authorization. Authorization is essentially granting your computer the permission to access and play content purchased from iTunes using your Apple ID. This ensures that only authorized devices can enjoy your purchased music, movies, TV shows, and more.
Step 1: Launch iTunes on Your Computer
The initial step is straightforward: open iTunes on the computer you want to authorize. Ensure you have the latest version of iTunes installed to access all the latest features and security updates.
Step 2: Sign in With Your Apple ID
Click on the ‘Account’ tab in the upper-left corner of the iTunes window. From the drop-down menu, select ‘Sign In.’ Enter your Apple ID and password when prompted. If you don’t have an Apple ID, you can easily create one by selecting ‘Create Apple ID’ and following the on-screen instructions.
Step 3: Access the ‘Account Information’
Once signed in, navigate back to the ‘Account’ tab and choose ‘View My Account.’ You might be required to re-enter your password for security purposes.
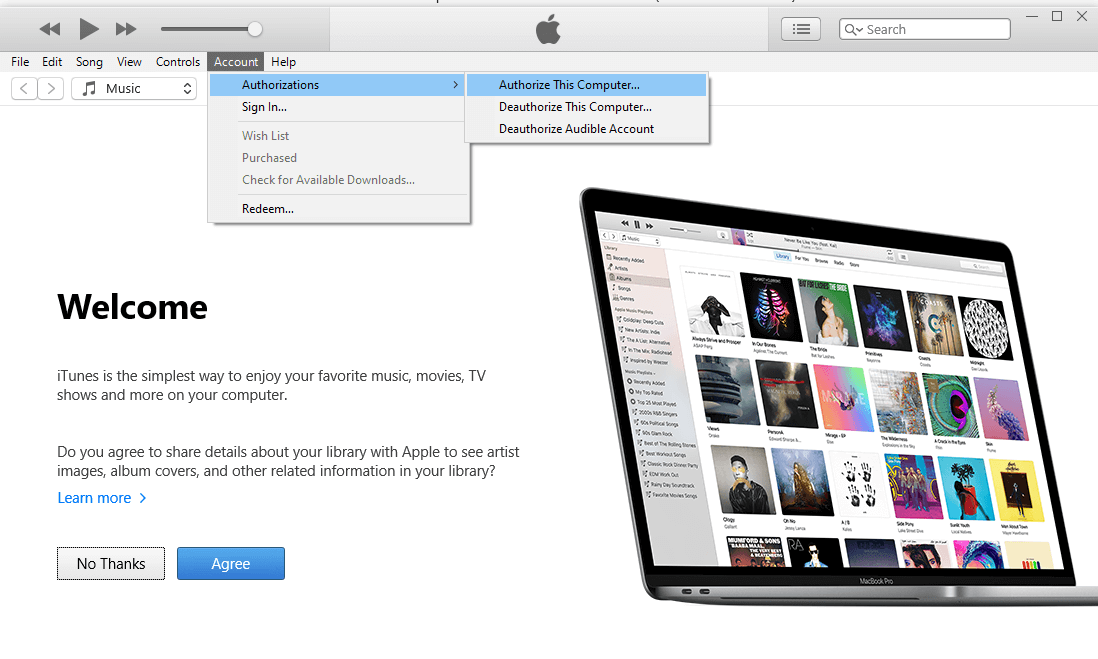
Step 4: Find ‘Authorizations’ and Click ‘Authorize This Computer’
Under the ‘Apple ID Summary,’ locate the ‘Authorizations’ section. Click on ‘Authorize This Computer.’ iTunes will prompt you to enter your Apple ID password again. This double authentication ensures the security of your account.
Step 5: Confirm Authorization
After entering your password, click ‘Authorize.’ iTunes will now verify your credentials and grant the computer authorization. A confirmation message will appear, indicating the successful completion of the authorization process.
Troubleshooting: Deauthorize Old or Unused Computers
It’s essential to manage your authorized devices, especially if you’ve reached the limit of five. To deauthorize a computer, go to ‘Account > Authorizations > Deauthorize This Computer.’ This step is crucial if you no longer use a particular device or if you’ve hit the authorization limit.
Benefits of Authorizing Your Computer on iTunes
Authorizing your computer on iTunes offers several advantages. Firstly, it allows seamless playback of your purchased content. Additionally, it enables easy synchronization with your Apple devices, ensuring your media library stays up-to-date across all platforms.
The Importance of Regular Authorization Checks
As you continue to enjoy the vast content available on iTunes, periodically reviewing your authorized devices is a good practice. This ensures you have control over your account’s security and prevents unauthorized access to your purchased content.
Conclusion: Empowering Your iTunes Experience
In conclusion, knowing how to authorize a computer on iTunes empowers you to make the most of your digital media library. By following these simple steps and understanding the nuances of authorization, you not only enhance your user experience but also safeguard your digital assets. So, go ahead, authorize your computer, and dive into a world of limitless entertainment at your fingertips.